
***UPDATE – 9/18/14***
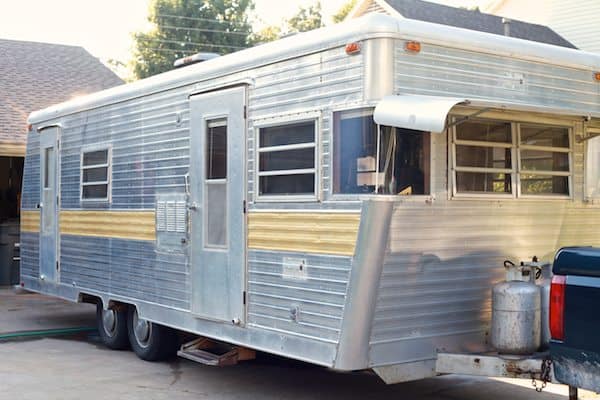
We’ve decided to borrow the same idea that many others have used since the housing crash and dream small. OB and I have downsized and move into our 150 square-feet for the next 2 years. Yes, you read that correctly, OB, the dogs and I now live in 150 sqft or more specifically the camper for the next 2 years. We will spend the next two years mega saving eventually to build a small house that can accommodate us and our family in the future. Follow our adventure under the dream small project section of The Noshery.
COME SEE THE AFTER AFTER! 😀
_____________________________
Well we are finally done with the mini-redo. Which, when we began the project, I thought was going to be mini-er than it turned out to be. We put a lot of sweat and tears into this lady, and I am so excited to share with you what we have done.
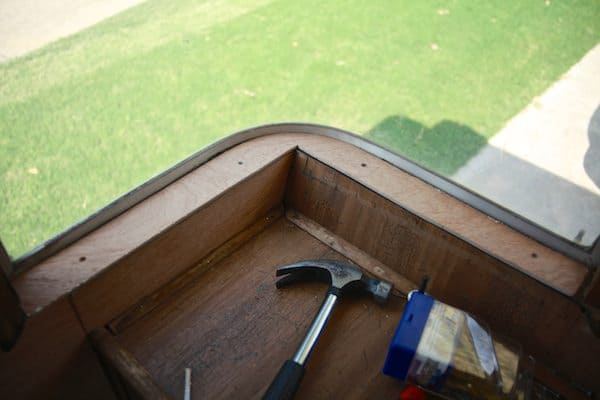
First there were some repairs needed. My handy hubby was right on it.
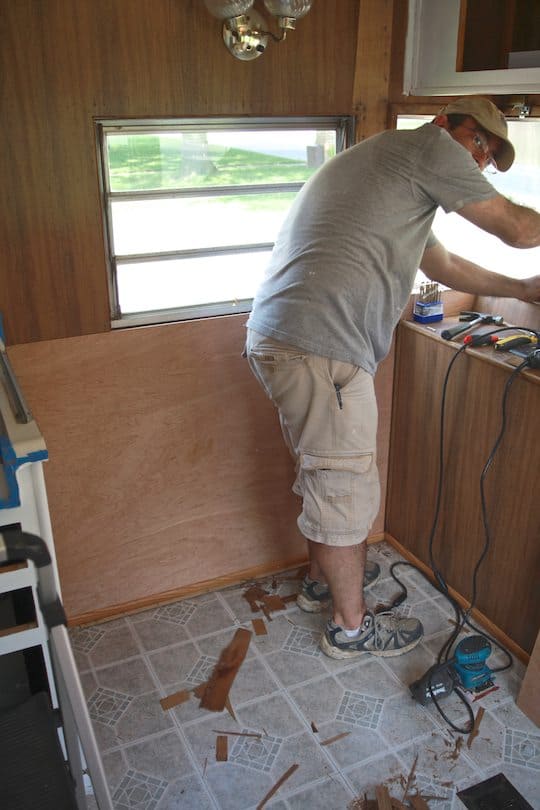
He replaced a damaged panel with a brand new panel.
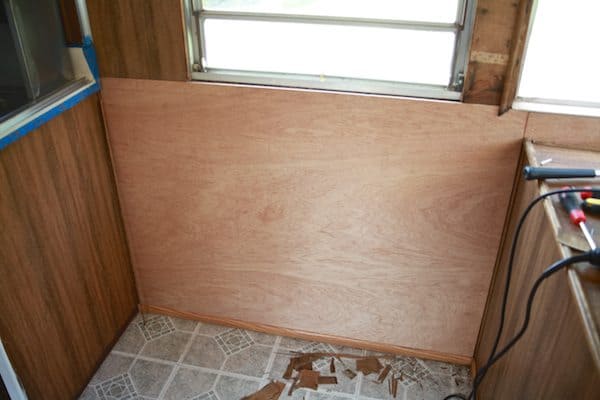
He also replaced the window sills which were damaged after 40 years in the sun.
Then we had an unexpected and unpleasant surprise. We had just had a brand new air conditioning unit installed. The condensation from the air conditioner made its way to a vent and leaked into the camper. Apparently the vent’s seal had deteriorated causing a leak.
We had to pull the refrigerator out into the middle of the “room” to clean the mess the leak had made.
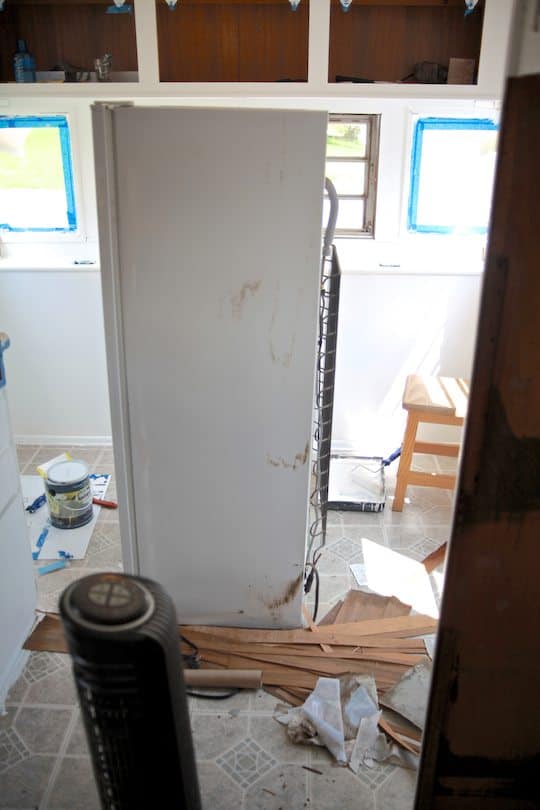
Handy hubby quickly climbed on top of the aluminum camper in the middle of a late summer day to repair the vent’s seal.

Finally after a week the interior was painted and ready for the doors to be hung.
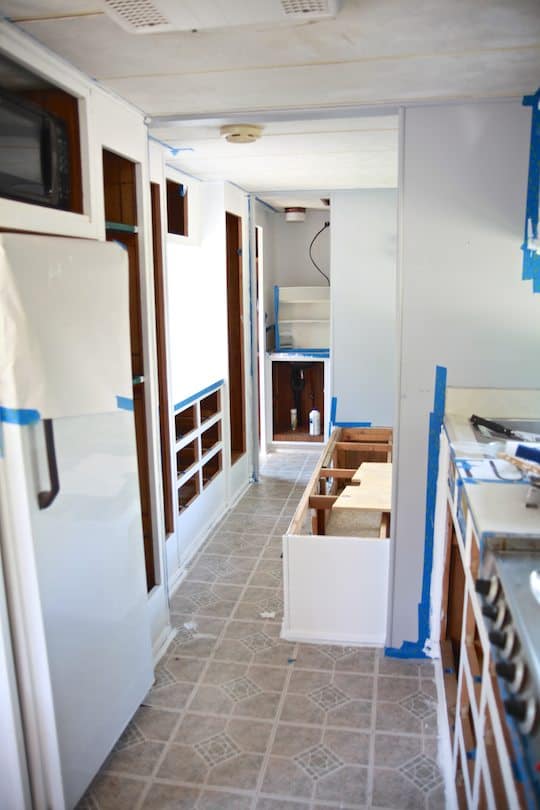
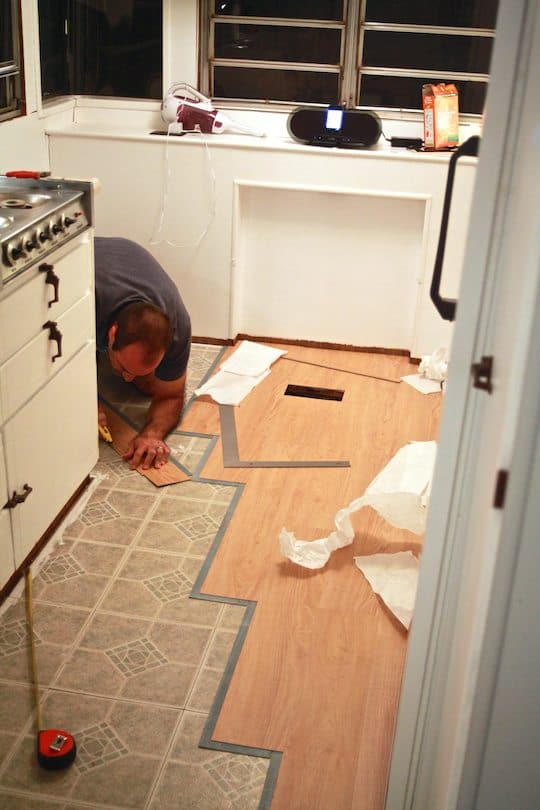
Then the floors where ready to be put down. This part took us awhile because we had to stop in the middle of installing to go on a road trip vacation with my parental units.
Finally after a lot of time, sweat and a trip to Ikea while in Dallas, the camper was ready. Do you want to see it? Because I think it’s pretty freaking awesome.
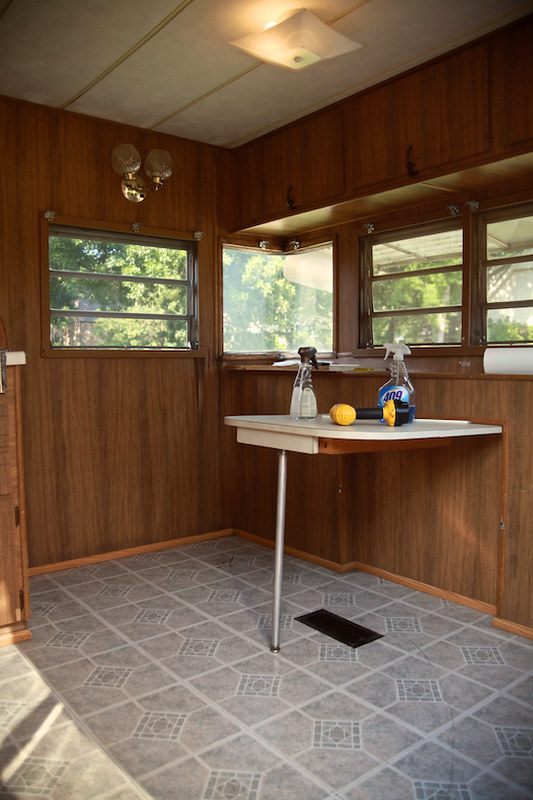
Here is a before of the dining area. Lovely dark wood paneling, dated light fixtures and sad grey vinyl floors.
Before
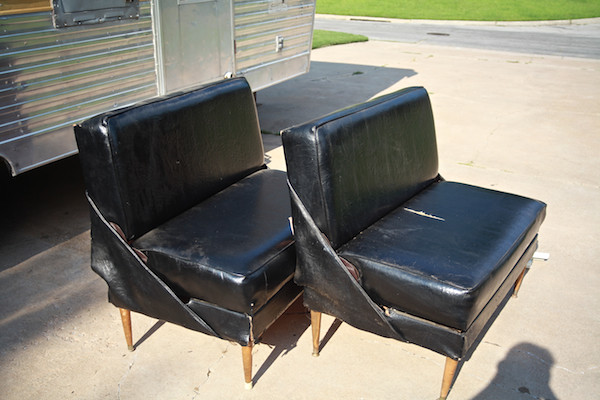
Of course I can’t forget to mention the black worn & torn benches.
TADA!!! Same space after the redo! Brand new paint, new floor, new window treatments, new light fixtures and upholstered benches. I developed some serious nail gun stapling skills, let me tell you.
After

Side-by-side

Her you can see it from another angle. So bright and cheery!

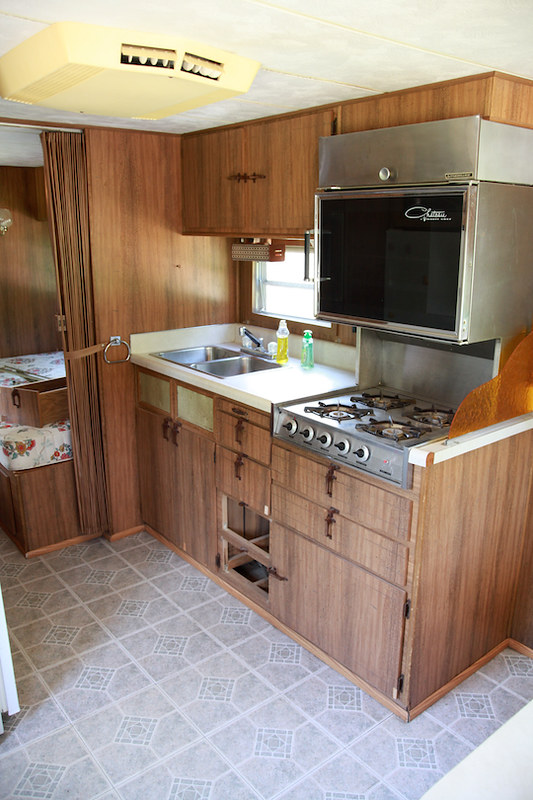
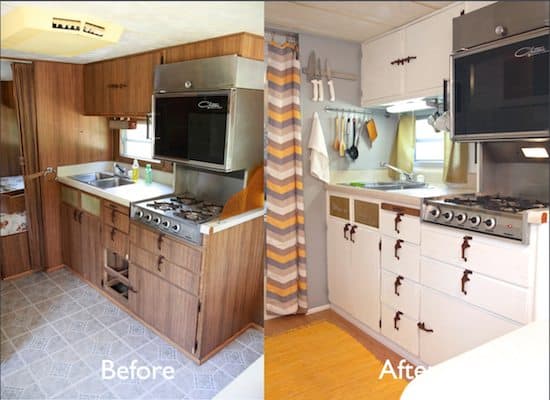
Let’s now move into the kitchen, just 1/2 a step away from the dining area. Besides that fact that the kitchen needed painting. I desperately wanted to rip the room divider curtain down. It was just dingy and yucky. Also the light fixture over the sink was insanely huge for the space!
Before
We replaced the divider with a chevron print curtain and got a more low profiled light fixture.
After

Side-by-side
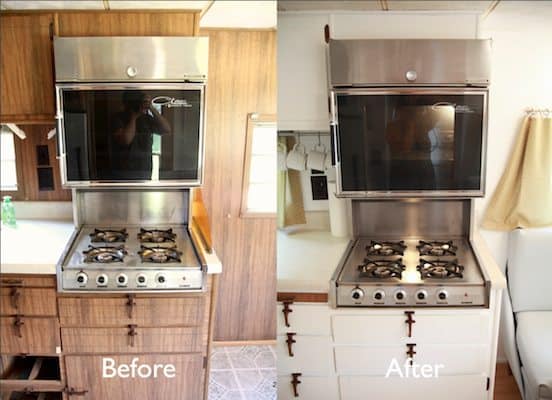
The range needed a good cleaning and polishing.
Before
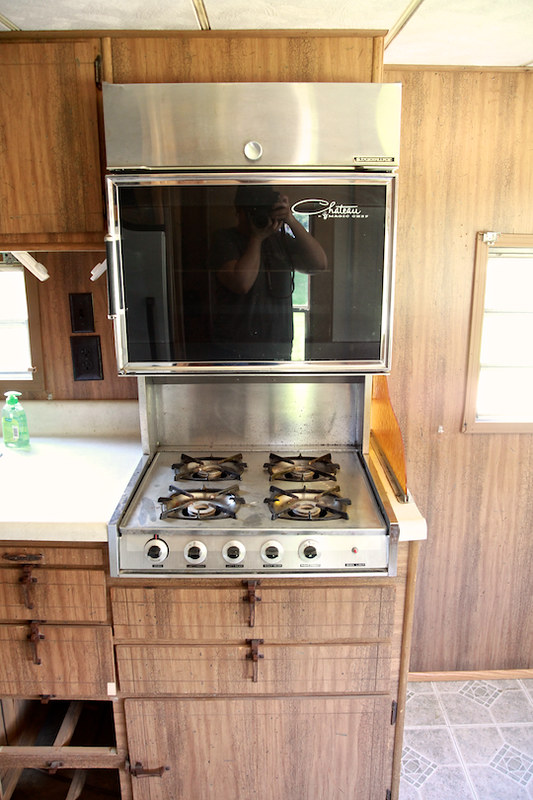
Using a Brillo pad, stainless steel polish and some hardcore elbow grease , I shined it up as best I could.
After

Side-by-side
In order to keep the kitchen as organized as possible I decided to store some frequently used items out, but off the counter.

The must have little coffee station.

On the wall I mounted a magnetic strip for knives and a rod to hang cooking utensils.

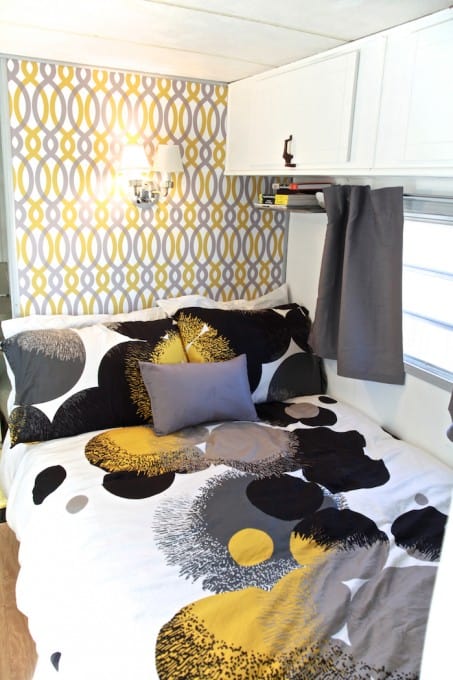
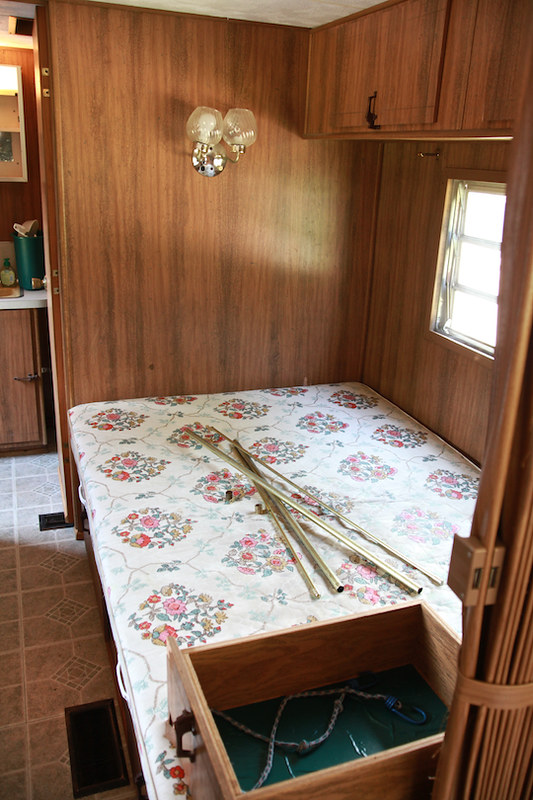
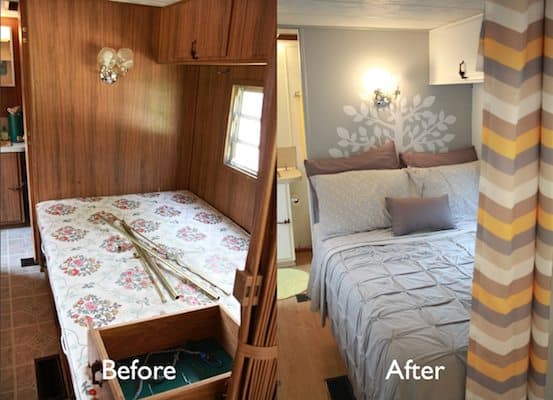
Now, let’s go through the door and into the bedroom. The most important thing about the bedroom was a new mattress. I think the one it came with may very well have been the original mattress. I might be being dramatic, but it wouldn’t surprise me.
Before
Now check out our cozy camper boudoir. Although we are still in search of the right light fixture. I wanted something as a “headboard”, but space is limited and thinks easily fall of the walls. I opted for a vinyl decal to decorate the head of the bed. The bedding is all from Target, and I am in love with the jersey quilt.
After

Side-by-side
Here is the view from the bedroom into the living space. We’re considering hanging a small flat screen tv at the foot of the bed, mounted on an arm that can be pulled out and be visible from the living space.

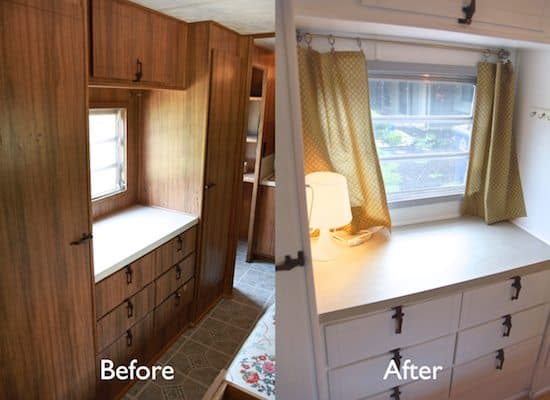
The vanity area across from the bed.
Before
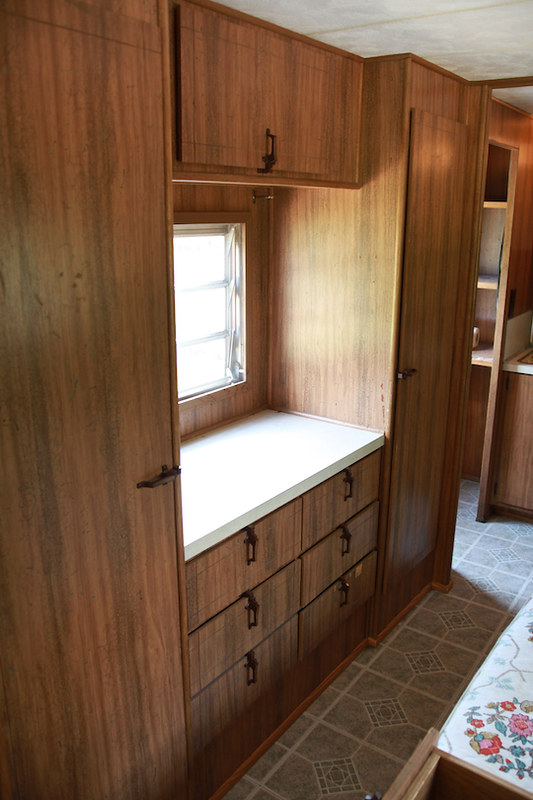
After

Side-by-side
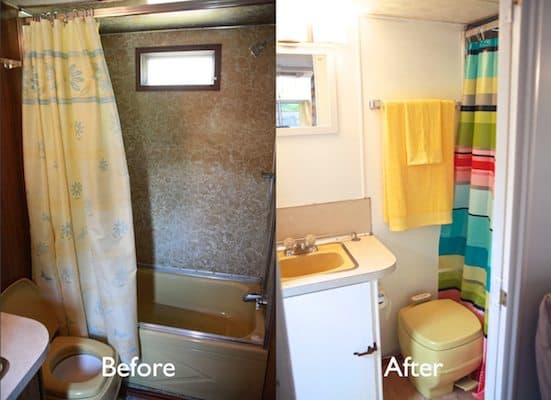
Finally the bathroom with the very scary shower curtain.
Before
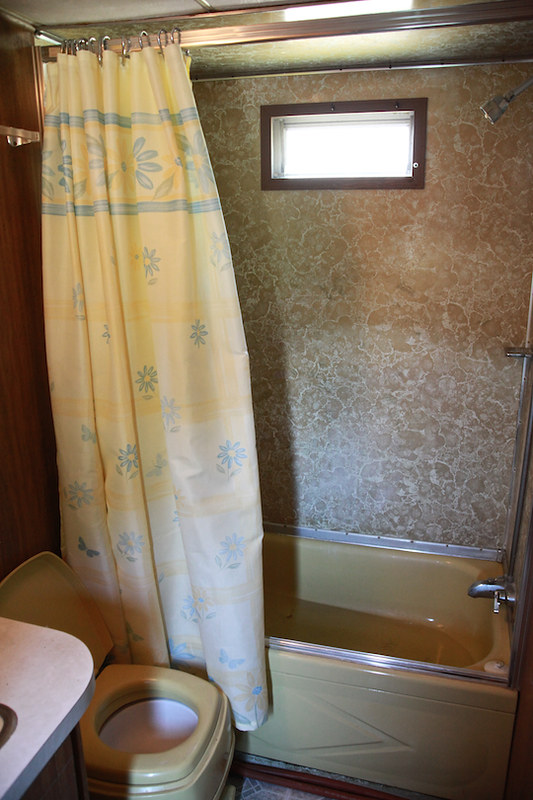
New shower curtain, new bath accessories and new vanity light. We are still trying to figure out the mirror situation, so for now we have this little square mirror on the wall that we have to take down during transport.
After


Side-by-side
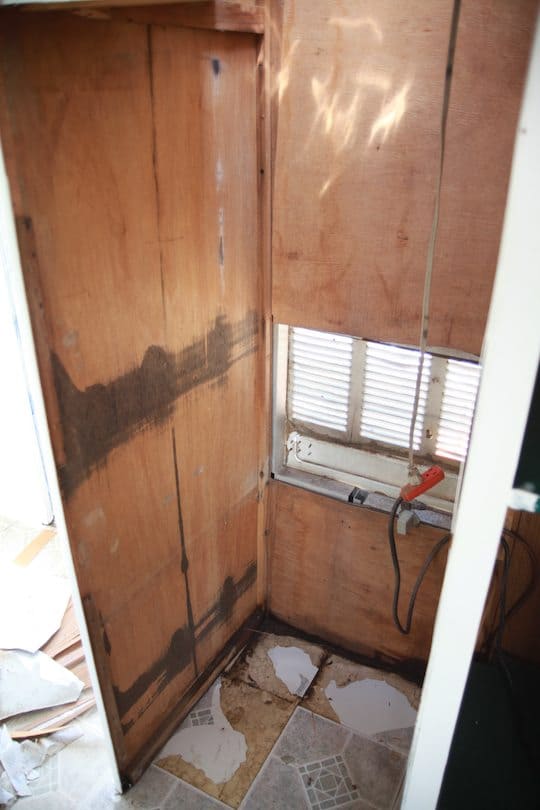
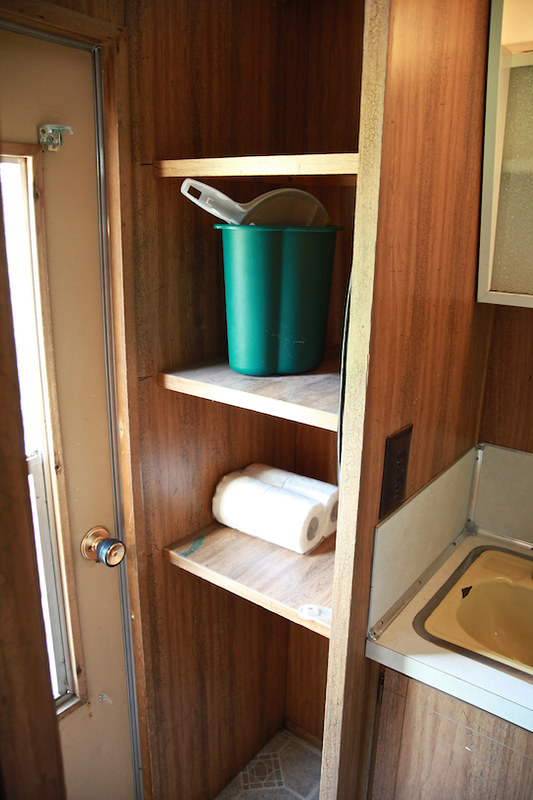
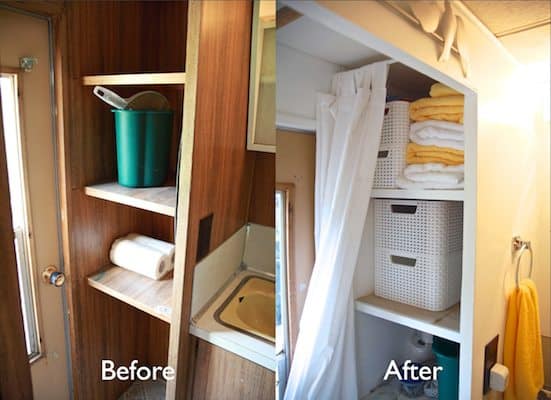
Finally there is the small storage area right off from the bathroom.
Before
A curtain was the perfect solution to covering it up.
After

I also got some baskets to help keep the space organized.

Side-by-side
After we finished with the camper, we just sat in it for over an hour enjoying all the hard work we had done. May goal was to brighten it up and make it homey. Homey and comfortable are important since the camper could very possibly be our temporary home if we don’t find a house in Dallas. I hope you like it as much as we do!
Wonderful job , you had vision and creativity . It all looks so fresh and bright . I’m working on mine right now and you’ve given me some great ideas . I’ll bet your all ready for the next project . Annie
Nice job! I wouldn’t mind going camping if I had that
I really wish I could stay in a 150 sqft home. These days people want to stay in big houses with grand entrances and stairways. Do we realise how distanced we get from our loved ones? A small home keeps the occupants close to each other and there is always visual connection amongst them. They can watch each other’s activities and this develops a strong personal bond. I just completed my BA hons degree in Architecture and this is the reason why I have used some architectural terms. I feel glad to know that there are still some people who prefer small homes.
Outstanding make over! What type of flooring was used (brand)? Looks like a peel and stick and am looking to do the same with my camper.
Thank you. Your camper is awesome
What make/ model is your camper? I am looking at one that looks just like it. The seller lists it as a Spartan, but I don’t think it is. It looks similar to a Boles Aero, but not quite the same. Nice work on yours by the way!
Ours was an Arrow Lite. I believe though it was a spartan body that was put on a mobile home frome. It was sold by a company in Broken Arrow, OK.
I have a 1966 Arrow Flite by chance were any of the body decals with the company and and logo on yours? I am looking to put them on mine I have nothing to go by. Martynbiloxi@aol.com
I am sorry but I no longer own the trailer. It did have a faded outline of a decal but I don’t think I have any images.
This is really amazing architectural design, thank you very much for sharing this awesome article.
You did a fantastic job. Looking for an older cheap camper to do the same. Thinks for many ideas.
Nice! This Glamper is amazing. Thanks for this one
Amazing, loved it. Thank you for sharing step by step before and after photos, I liked sideways comparison where I can quickly capture the changes. Keep the good work!
Beautiful! You guys have put a lot of work into her. 🙂
beautiful job! I love your sense of style. have you moved out of the camper yet? We have a camper that is smaller than yours, but we don’t live in it LOL I’ve done a lot of mods that you might find interesting, especially ways to find storage space. I’d love to know what you think. http://WackyPup.blogspot.com
This camper looks better than my apartment. I’ve seen a few other people ask this but how much roughly did it cost? Have you got a list of all the places you’d recommend?
Hi there!
What an amazing job you have done with your camper. I finally found something to compare to what ours currently looks like and this is pretty much the exact look I want to go for with it!
I have a question for you if you get time though… What did you do to your bathroom wallpaper? Our camper is a 1976 and the wallpaper in the bathroom is just plain scary and we aren’t sure if we can just rip it off and buy new, or what it’s even made of!
Did you buy white wallpaper and put it on top of the original stuff? Or have you just painted over top?
If you could recommend a type/brand of either wallpaper or paint that would be more helpful than you could even imagine!!
Thanks in advance for any help, and great job with your renovations!
Hope to hear from you soon!
We just covered it with primer and painted over it. There is no need to remove the wallpaper. We have done this with both of our campers’ remodels. Check out my post How to Paint Camper Camper Interior.
hello, we are about 2 days from purchasing our first camper. she is about 16″ long, i cant recall the year at the moment but the current owner and his family have been living in it for about a year, it def needs to be renovated… our plan is to gut it and redo everything. more or less how much did ur reno cost you? my wife and i are very crafty, handy and we are excited about starting our project…
Mario
Wow! Beautiful, beautiful work! We’re planning to renovate our 2000 Georgie Boy Landau Class A as soon as it gets a bit warmer (we’re in a Chicago suburb) and you’ve really inspired us. Thanks so very much for showing all of your awesome pics. Safe and happy travels to you! 🙂
Ooooh wow… Absolutely amazing!!!! Great job indeed!
Hi I had a question about your oven is there a trick to get it working because I can get the piglet light going but that’s all it dose
The before and after photos just thrilled me. Beautifully done redo’s. Thank you for sharing. It is an amazing post.
Hey! Love this step- by -step! What type of car/truck do/did you use to pull this camper? Thank you in advance!
What size is the bed? I absolutely adore this!! Great job!!
This was great to look at your blog with all your trailer details. I love all the color choices you made! That wall behind your bed is to die for too! My husband & I absolutely are addicted to these trailers! We have a 1965 Aladdin! We completely restored her, “Penney Lane”. We refinished all her interior wood, her seats got new foam & we covered one side of them in Pendleton wool. We made her new curtains to match, took all her windows out, resealed them, hand polished all her chrome (even surrounding her windows). She has a new floor & sports a new top of the line automotive paint job on her exterior. She’s our baby! My hubs & I designed some vintage trailer logo shirts to contribute to a great cause of helping at risk youth get off the streets as Portland Oregon has the highest number of homeless youth then any other place in the US. Check out the four designs we did! There’s even an Aladdin!!! https://www.etsy.com/shop/TheNorthLives?ref=hdr_shop_menu
Very very nice job! I remodeled my own 1984 and I think the best part is doing it the way YOU want it! Nothing feels better!
I have a nosy question about colors. Which paint colors did you use? Especially for the kitchen and bedroom. 🙂 I’m about to tackle my own project of tons of painting, and I really like your choice of colors.
My husband and I are in the process of renovating our camper. As I looked at many images on Google, your photos popped up a lot. I got some great ideas from them! Nice work!
Amazing transformation. This could be more wanted trailer and it gives some inspiration to some other campers who are thinking about doing some transformation from camper to glamper.
Inspired!
I love what you have done and want to do something similar!
Very well done! It’s really lovely.
Nice job! I find some really good tips here. Thank you 🙂
Nice job. Thanks for the inspiration. 🙂
I find some really good tips here, I love travel and I am always thinking about a “mobile home” like this, on it I can go anywhere I want. This post inspire me a lot, thanks Meseidy
Meseidy- Thanks so much for this WONDERFUL tutorial!
Hello, I am in the process of updating my 1978 GMC motorhome. I am curious if your walls and cabinets were a shinny laminate looking material or raw wood? I would love to paint the interior of mine white just not sure how to since it’s the shinny laminate high gloss looking smooth panels. Any tips would be greatly appreciated 🙂
Jackie,
Did you try it? We are also getting started on a GMC. Our walls are luan but I don’t think they are glossed. Let us know how you’ve progressed.
Cheers.
Here is a post I did recently on how to paint camper interior. I hope this helps. http://thenoshery.com/how-to-paint-camper-interior/
HEY there fellow camper ! I live in a suburb of Dallas called wide awake wylie ! Love your before and afters. We are selling our hole and I will be finding a camper to redo as well! You blog gives me hope!
Our home is such a dump and in need of so much repair that we aren’t able to afford nor capable of doing ourselves that I wouldn’t mind having that to live in FULL TIME! It would definitely be a step up in our living conditions.
Great job you guys!
Nice Job!
That’s what we r doing right now we have a 30 ft. Coachman 1976 and we r redoing all of floors walls everything will post pics when complete and ur is beautiful love the bright wall makes it look so much bigger and cleaner we r painting ours white also and dark wood floors thank u for sharing
Love it!! Great work :). Do you mind sharing how you painted all the vinyl walls/cupboards? Did you just sand and paint? Thank you!
Oh, your photos look great. You must be very happy after finishing your works and looking back your result. Congratulation^^
Fantastic, so light and airy, I could definitely live in that space. Great job.
Wow, It looks amazing. I really like this. Awesome awesome job.
Love what you did … I’m about to do the same with our ” country ” Texas look rv, and turn it into a Holliday Inn look … to bad I cannot post my before and after on you page .. but I could send you an email if you want … anyway … just want to share that you and Hubby did a great job
You did a great job. My husband and I have done a few remodels and I so wish we had the before pictures. Some people may think it is silly but you bond with the what you put you personal touches into, I guess a sense of pride.
So beautiful, I love it! How long approximately did it take y’all to finish it up My husband, kids and I are going to be living in our travel trailer for 6 months, and I am trying to get it live-able for May! Truly amazing job 🙂 OOH, also, did you just paint right over the siding? We have wallpaper stuff in ours, and not sure if it would look as nice, or work as well.
Hi, your rv looks lovely!
Can you tell me where you found the fabric for your yellow curtains? Also, where did you find the curtain rods to hang it?
Thank you!
The first curtains i madr myself but, in the latest update i got tracks and curtains from IKEA and just hemmed the curtains. Their track system has worked great!
Hi looks great. What is it that you laid on the floor? Is it floating boards or some kind of Lino?
It’s a floating floor of vinyl floor planks that look like blonde wood. They have worked great! Easy to clean and durable for the pups.
Magnificent! What you have there is a piece of art, well done very detailed job. Can you please give us the estimated cost?
We have a new camper just for recreation and your redo far out does ours in functionality and décor. Wonderful Job!!
This is totally awesome.Although variety of article on this topic,this article contains some of the precious points which can never be read in other articles.
You created such a lovely, cheery space for the two of you. I guess by now you have been living in it for awhile. Any new changes or ideas on how to live in a trailer for a length of time?
Excellent, excellent, excellent!!! You guys did a terrific job!
So inspirational! I am trying to talk my better half into doing exactly the same thing. LOVE your before and after pictures.
It is so adorable! Can’t wait to see it in person when you come stay with us!
Soooooo pretty! We are currently looking at doing a similar remodel and I was having such a hard time with the yellow toilet/shower in the bathroom, you totally nailed it!
Wow it looks awesome!
This is SO amazingly awesome! I just bought a hideous 1976 Terry trailer (my first) and was browsing for ideas to pretty it up. I was shocked to see you have the exact same layout as I do. Amazing job! I’m so inspired now. 🙂 Thank you!
JoAnn
Amazing transformation. I love it.
This is so beautiful! I am about to renovate a travel trailer myself. May I ask about how much you ended up spending on all the renovations? You can send me an email if you’d like to keep that info more private. Thanks so much!
Your reno is the best I have seen. You have given me many ideas to use on my 97 GeorgieBoy Class C.
I can’t help but wonder what the original designers were thinking when they decorate these things.
Good luck and happy camping.
I love this so much I’m going to talk my husband into doing this with me!!! LOVE!!!!!!!!!!!!!!!!!
I love love love this trailer! You guys did a fantastic job. What year is the trailer and what kind is it?
It’s a 1972 ArrowFlite. It was actually made by a mobile home company in Broken Arrow, OK so, it’s build on a mobile home frame. Super sturdy!
Absolutely amazing transformation!! It looks so beautiful!
Hi!! I’m re doing my camper too! Wondering about lighting! How did u replace the fixtures? Particularly the kitchen one? Did u need soeical light bulbs for the others? Thanks in advance 🙂
We just replaced them with fixtures that we got at Home Depot. My husband did most of the work. 😀
Fantastic job, and a DIY to boot, the touch of genius was that shower curtain to take the dated color ceramics and up-date them to today and beyond. Bed is inviting, kitchen table needs a bouquet of flowers to finish it off!
WOW! you guys did a great job! I think I could live in there for sure!!!!
Beautiful! What color did you use in your bedroom/kitchen?
We used Behr’s PREMIUM PLUS ULTRA base white & French Silver.
Hi!
Fantastic job! I am in the process of revamping a caravan and I was wondering with the wood panelled cupboards etc did you paint straight over the top or rip the surface layer off and paint it? Any advice would be AMAZING!!
Thanks
We painted straight on to the paneling, but our paneling was textured not smooth. It all depends on what kind of paneling your dealing with, I would suggest maybe doing a test on a door. Also, we used Behr PREMIUM PLUS ULTRA with paint and primer in one.
Hey my husband and I just bought a 1983 camper and its got the ugly old paneling look, and u=I would really like to paint over it but I have no clue what to use, whats the best to use without having to tear the walls off and putting up something different??? Thanks, your camper looks great by the way
Where did you find the chevron curtain divider?
I just saw this curtain at Target.
Thanks Kim,
Was it a shower curtain or window curtain?
Oh. my. goodness. So, so cute. What a great makeover. I don’t usually comment when I browse these type of posts, but you did such a great job. What a great space.
Love it!!! You have given us a TON of inspiration and ideas!!!
This is fantastic, Meseidy!! I am thrilled for you. We’ve been talking about doing something similar for a while now and this is so exciting to see finished. What fun! I love it. You guys did an amazing job!
This is soooooooooooooooo adorable and thanks so much for sharing. I have been thinking of what to do with a 1975 Rancho Del Rey and it’s brown paneling and now I can see how great the paint job (what I wanted to do but wasn’t sure) willl look!
Awesome remodel, have fun with it, Molly
Beautiful work…this was the kind of post I was looking for. Love your color palet and painting…so relaxing. Now get that gorgeous thing to the lake!!
Hi there, great work, how many square feet is your camper, wife and I are going to do a similar project. What was the cost like?
Hi Meseidy,
Your renovation is beautiful! I love everything! It is amazing how much a little color changes everything in those old panel campers! You and your husband did a wonderful job!
Quick suggestion… if the bathroom toilet, tub, sink is plastic (like I believe it is), pickup a few cans of plastic spray paint and get rid of the yellow. It will make a world of difference. Do you know what kind of paint I am talking about? The kind that is specifically for painting plastic. I think you can do it all in less than 2-3 cans MAX! My husband has used it to spray paint sinks and tubs in older mobile home remodels and it makes such a huge difference. 🙂
Otherwise, I’m in LOVE and can’t wait to do one myself!
Happy Travels,
Victoria
Drive Me Crazy Family Adventure
P.S. We have the same blanket and it is the softest blanket I have ever used…bought it for my teen son and I steal it every chance I get! lol
Thanks for suggesting painting the tub/shower. I have thought about doing that, but was not sure how it would work!! Now I am going to do it!!
Meseidy, I love what you did with your camper. I am about 90% finished with a 72 Frolic. Now known as the Pink Paradise. In fact, I’m so close to being done with it that I’m looking for my next project 🙂 We had to do some major rehab in our bathroom which slowed us down a bit. If you have a minute check her out – she’s on my blog. Lot’s of before and afters. I’m also looking for camper remodel stories to share on my blog if you’re interested??
We are in the process of renovating our camper! Our walls are similar to your previous walls. Any specific paint you used? We are going to paint the walls and cabinets as well.
Love it! I was curious if you sanded the cabinets first and how the paint is holding up?
We bought a older22′ trailer last summer and have made some changes but you have now inspired me! The great part about redo’s is it’s your own taste! not cookie cuttered! Thanks for the Ideas!
Love, love,love it.
You did an amazing job on the RV renovation! I love the colors you selected! So comfortable but classy. 🙂
Love, love, love what you’ve done. We have a new little camper and I’m trying to paint it. The primer is beading up. Can you tell me what kind of paint you used? Enjoy your new baby and I hope we meet on the road some day.
marsha
We didn’t use a primer & paint, we used Behr Premium Plus Ultra, it’s a paint and primer in one. It’s did a great job!
Great Job! Love the “bedroom” area! What kind of trailer is this one? The floor plan is one I’d like.
WOW..THAT’S A AWESOME TRANSITION THERE!!!! I RATHER LIVE THERE!
….I woulda put either bi-fold french doors between bedroom and kitchen/dining area…but that’s just me 🙂
Beautiful!!! Dream big, work hard, and be proud of what you two have done, thanks for sharing.
Fantastic makeover on your ‘minihome on wheels’! Your color choice makes it looks so spacious and very comfy. Thanks for sharing.
Very well done! It’s really lovely.
AH! this is so beautiful. I just got my first trailer and I’ve started the remodel. This is so inspiring!
wow, just wow! i have a huge a smile….such an amazing job…..sooo pretty to look at! wow!
Love that work. Its simply awesome. Thanks for sharing your experiences with us.
Very nice job, it looks amazing, I too have a camper and you have inspired me to make a few changes.
It was awesome! Thank you for sharing it with the rest of us! Good luck house hunting.
This is fantastic!! We love to camp and are in the market for a “new to us” camper. Your remodel is an inspiration and opens up a larger shopping market for our new camper. Hubby is very handy and these pictures demonstrate what can be done. Thanks for being the push we needed! Happy camping!
Standing ovation, damn y’all killed that project! You should submit that to Family Handyman. I love how you kept the retro feel while still modernizing it.
You and the Handy Hubby did a great job livened the place right up!!
I LOVE your camper remodel! We just bought a vintage camper that needs a lot of love and you’ve given me lots of great ideas!
Beautiful job – love what you have done to brighten, clean and make it your own. May it keep you cozy and safe. FYI- I noted the chip in the bath sink (sorry). I had a chip just like that. One day I grabbed my acrylics and started mixing colors. I finally got what seemed just the right shade, keeping in mind that acrylics dry a tad darker. I thinly applied several light coats and hit it w my blow dryer between each one. I allowed it to cure and then applied several light coats of clear nail polish. The chip “disappeared” and despite thinking otherwise, I never had to retouch it again. Thanks for sharing!! Adorable and good luck house hunting!!
Thanks for the tip! I’ll keep it in mind. 🙂
Thanks everyone for such kind words. I am glad you all like how it turned out as much as we do.
Great job! Love it when a labor of love works out in the end. Happy travels.
SO. STINKIN. AWESOME!!!!!
WOW WOW WOW!!!!! It looks amazing! I hope you all are doing well and miss seeing you!
Miss you guys too! We are well, just getting ready for our move to Dallas.
Felicidades! The job you guys did is amazing!! It looks from a magazine! Enjoy it and good luck with house hunting.
That looks awesome, you guys did a great job!
It came out fantastic. Great job!
It’s beautiful and I am SO jealous!
AMAZING Work! I am IMPRESSED! Meseidy, you not only are an amazing chef, but you have super skillz at decorating! Beautiful, classy and charming, all in one package!
Thanks so much Shauna! OB has been harassing me to hurry and get this post up so he could show it off. LOL
This is really cool, you guys did an awesome job!! I love your blog!!
Now that’s a glamper! Nice job! I wouldn’t mind going camping if I had that! 🙂
Awesome awesome job. Been fun watching
I was wondering which kind of paint you used and did you have to sand it before?